

 Sasha Campbell
Growing plants from seeds can be fun and rewarding. You plant a tiny seed, care for it, and watch a new plant appear. You do not need a large garden to begin. A few pots or a small garden bed can be enough.
Sowing means planting seeds, but it takes more than digging a hole. Some seeds need a soil cover. Others need light to sprout. Water, warmth, and planting depth also matter.
Learning how to sow seeds properly helps you avoid common mistakes. This beginner’s guide explains how to prepare your growing space, plant seeds, and care for new sprouts.
How to Sow Seeds for Planting
Follow these simple steps to give your seeds a good start.
1. Read the Seed Packet First
Before opening your seeds, read the packet. Think of it as a small guide for that plant.
Look for these details:
- When to sow.
- How deep to plant.
- How far apart to space seeds.
- How long sprouting may take.
- Whether to start indoors or outdoors.
- Any special steps before planting.
Keep the packet after sowing. You may need it later to check spacing or care tips.
Choose the right sowing time for each plant. Some seeds need warm soil. Others grow better in cooler weather.
Avoid starting indoor seeds too early. They may become tall or crowded before it is time to move them outside. [1]
2. Choose Where to Sow Your Seeds
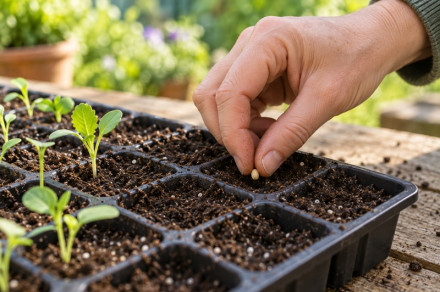
You can sow seeds in small pots, seed trays, or straight into a garden bed.
Planting straight into the garden is called direct sowing. Carrots, radishes, beans, and peas are common choices for this method.
Starting seeds indoors lets you care for them before moving them outside. This helps when outdoor conditions aren’t yet suitable.
For outdoor sowing, check that the soil is warm enough for your crop. Beans and squash need warmer soil than peas and lettuce.
In places with frost, wait until the frost danger has passed before sowing warm-season crops. Check local planting advice to help you choose the right time.
Start with a few kinds of seeds. A small batch is easier to water, label, and watch.
3. Prepare Your Pots or Garden Bed
For pots and trays, use a light seed-starting mix or suitable potting mix. Heavy garden soil can hold too much water in small pots.
Choose clean containers with holes in the bottom. These holes let extra water drain away.
Wet the mix before filling your pots. It should feel damp, like a squeezed-out sponge.
Fill the containers and gently level the surface. Do not pack the mix tightly. [2]
For garden beds, remove weeds and break up large soil clumps. Rake the surface until it is fairly smooth.
This helps small seeds touch the soil instead of falling into large gaps.
4. Check Whether Seeds Need Light or Darkness
One important rule to remember is that not all seeds should be buried.
Some seeds sprout best when covered. Others need light to help them sprout. Sprouting is also called germination.
Seeds that sprout best in darkness
Cover these seeds with growing mix or fine soil. Follow your packet for the right depth.
- Calendula: Cover lightly. About ¼ inch deep is a useful guide, but follow your packet.
- Nasturtium: Sow about ½ inch deep, unless your packet says otherwise.
- Cosmos: Cover with mix at the depth listed on the packet.
- Zinnia: Cover with mix at the depth listed on the packet.
- Sunflower: Cover with soil. Check the packet, as planting depth can vary.
- Sweet pepper: Cover with a light layer of mix, following the packet.
These seeds are commonly covered for sprouting. Calendula sprouts best in darkness, and the other examples also need darkness in seed-starting guides. [3] [4]
Do not bury them extra deep to provide more darkness. A thick soil layer can make it harder for sprouts to reach the surface.
Seeds that benefit from light
Place these seeds on the surface of damp growing mix and gently press them down:
- Lettuce
- Celery
- Petunia
- Snapdragon
- Ageratum
- Wax begonia
Light helps these seeds sprout. Avoid burying them under a thick layer of soil. [4] [5]
Surface sowing means placing seeds on top of the damp growing mix. Press lightly so they make good contact with it.
Leave them uncovered unless the packet says to add a very thin layer of mix. Keep the surface moist, as exposed seeds can dry out quickly.
Needing light does not mean seeds should sit in hot, direct sun. They still need moisture and a suitable temperature.
5. Sow at the Right Depth and Spacing
For many seeds, a useful guide is to plant about twice as deep as the seed is wide. However, the packet’s directions come first. Seeds that need light are an exception.
Use a finger or pencil to make small holes. A ruler can help you check the depth.
Follow the seed spacing on the packet. It may also show a wider distance for plants after thinning.
For tiny seeds, gently tap the packet to scatter them thinly. For larger seeds, place them one at a time.
Cover only those that need covering. Then gently press the surface so the seeds touch the mix.
Label each pot or row with the plant name and sowing date. This helps you remember what you planted.
6. Water Gently and Keep Seeds Moist
A strong stream of water can move seeds or bury them too deeply. Use a fine spray or a watering can with small holes.
Keep the growing mix evenly moist while seeds sprout. Do not let it become soggy. Seeds need oxygen as well as water.
Check your pots each day. Surface-sown seeds can dry out quickly, especially in warm weather.
A clear cover can help indoor trays hold moisture. Remove it once sprouts appear. Keep covered trays away from strong direct sun, where heat can build up.
Let extra water drain away. If you water from below, let the mix soak up moisture, then empty any water left in the tray.
7. Give Seeds Time to Sprout
Seeds do not all grow at the same speed. Radishes may appear within a few days, while celery can take two or three weeks.
Temperature also affects how quickly seeds sprout. Lettuce usually sprouts best in cooler conditions than many warm-season crops. [4]
Write the expected sprouting time on your label. This can stop you from giving up too soon.
Avoid digging up seeds each day to check them. Keep caring for the planted area and watch for new growth.
8. Care for the New Seedlings
Once sprouts appear, they need enough light to grow well. Even plants whose seeds needed darkness now need light.
Many indoor seedlings need about 14–16 hours under grow lights each day. Turn the lights off at night. Follow the light maker’s guide for placement. [2]
If seedlings grow too close together, remove some to give the others room. This is called thinning. Follow the final plant spacing on your packet.
Before moving indoor seedlings into the garden, help them get used to outdoor life.
Start with short visits to a shaded spot sheltered from strong wind. Over about one to two weeks, slowly give them more time outside and more sun. Bring them indoors if the weather is too cold.
This is called hardening off. [6]
Takeaway
Sowing seeds properly starts with reading the packet. Prepare a good growing space, check planting depth, and learn which seeds need light.
Keep seeds moist, allow time for sprouting, and give young plants room to grow. With steady care, your small seeds can become healthy garden plants.






[…] lettuce in early spring or fall if you live in a cool or mild area. You can often sow the seeds two or three weeks before the last spring frost. In warm climates, grow lettuce during the coolest […]
[…] sowing the seeds, they take 50 to 80 days to reach the cooking stage and about 30 days to grow and mature from the […]
[…] grows slowly at first, so sowing seeds early helps ensure full-sized heads before hot weather arrives. This is especially important for […]
[…] plants can usually handle light frost. Sow seeds about 8 to 10 weeks before the first frost, or plant young seedlings later in the […]