

 Sasha Campbell
Harvesting vegetables from your garden is exciting. After months of planting, watering, and caring for your crops, you finally get to enjoy the results.
But harvesting is not always the last step. Some vegetables keep better if you cure them before storage.
Curing means keeping freshly harvested crops under the right conditions for a certain amount of time. It can help small wounds heal and make skins, shells, or outer layers stronger [1].
For crops such as onions and garlic, curing also helps the outside layers dry. For sweet potatoes, curing can even improve the flavor.
However, different vegetables need different curing conditions. Some like warm and humid conditions. Others need a dry place with plenty of airflow.
Garden Crops You Should Cure After Harvesting
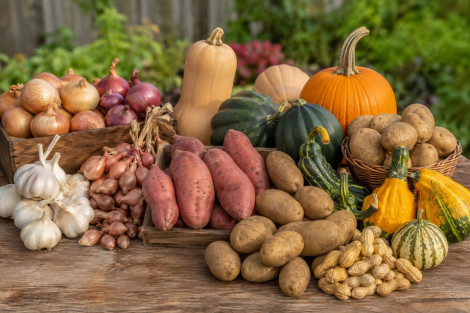
Below are nine vegetables and crops you can cure after harvesting, including potatoes, sweet potatoes, garlic, onions, winter squash, pumpkins, shallots, peanuts, and gourds.
1. Potatoes
Potatoes can easily get small cuts and scrapes when you dig them out of the soil. Curing gives these minor injuries time to heal and allows the skin to become tougher.
After digging your potatoes, gently brush away loose soil. Avoid washing them before curing. Extra moisture can encourage rot.
Place the potatoes in a dark, well-ventilated area. Light can cause potatoes to turn green.
Green areas can contain higher levels of natural toxins. Cut away small green areas, but throw out very green potatoes.
Potatoes cure best at about 50 to 60°F (10 to 16°C) with high humidity and good airflow. Let them cure for about 2 weeks. Some potatoes may need a little longer for their skins and small wounds to heal.
After curing, check the potatoes carefully. Remove any that are badly cut, soft, green, or showing signs of decay.
Store the good potatoes in a cool, dark place with plenty of airflow.
2. Sweet Potatoes
Sweet potatoes need warmer curing conditions than regular potatoes.
When freshly dug, sweet potatoes have thin and delicate skin. Even gentle handling can cause scratches. Curing helps toughen the skin and heal small wounds.
Curing also helps improve their flavor. During the process, some of the starch changes into sugar. This is one reason cured sweet potatoes often taste sweeter.
After harvesting, gently remove loose dirt. Do not wash the roots before curing.
Keep sweet potatoes at around 80 to 85°F (27 to 29°C) with 85 to 90% humidity and good airflow. Let them cure for about 7 to 10 days.
After curing, move them to a cooler storage area. A temperature of around 55 to 60°F (13 to 16°C) works well.
Do not keep raw sweet potatoes in a very cold refrigerator for long-term storage. Temperatures that are too low can damage them and affect their taste and texture.
3. Garlic
Garlic needs to dry well before going into storage. Curing helps dry the neck, roots, and protective layers around the bulb.
Harvest garlic when several of the lower leaves have turned brown while some upper leaves are still green.
Carefully loosen the soil around each plant and lift the bulb. Avoid pulling hard on the stem because this can damage the garlic.
Do not wash freshly harvested garlic.
Instead, keep the plants whole and place them in a dry, shaded, well-ventilated area. You can hang garlic in small bundles or spread the plants across racks or screens.
Allow garlic to cure for about 2 to 4 weeks.
It is ready when the outer layers feel dry and papery, the neck is dry, and the roots have become brittle.
Once cured, trim the roots and stalks as needed. Softneck garlic can also be braided.
Store your garlic somewhere cool, dry, and dark with good airflow.
4. Onions
Onions are another garden crop that benefits greatly from proper curing.
Curing dries the neck and creates papery outer layers around the bulb. These layers help protect the onion while it is in storage.
Onions are generally ready to harvest when their tops begin to fall over and turn brown.
Carefully lift the bulbs from the soil. If conditions are dry, they can remain on the soil surface briefly. However, move them somewhere protected if rain or heavy dew is expected.
Spread your onions in a single layer in a dry, shaded place with plenty of airflow.
Allow them to cure for about 2 to 4 weeks. They are ready when the necks are completely dry, and the outer skins feel papery.
Trim the roots and dry tops before storage, unless you plan to braid the onions.
Check each bulb carefully. Damaged onions and those with thick or moist necks should be used first instead of being placed into long-term storage.
5. Winter Squash
Many types of winter squash benefit from curing. These include butternut, Hubbard, spaghetti, and kabocha squash.
Curing helps harden the rind and heal minor surface damage. For some varieties, it can also improve storage life and eating quality.
Harvest winter squash when it is fully mature. The rind should feel hard and should not be easy to pierce with your fingernail.
Cut the squash from the vine rather than pulling it. Leave a short piece of stem attached.
Many winter squash varieties can be cured at around 80 to 85°F (27 to 29°C) for approximately 7 to 14 days. Good airflow is important.
However, not every winter squash should receive the same treatment. Acorn squash, for example, generally should not be warm-cured, as this can reduce its storage quality.
After curing, store suitable winter squash at around 50 to 55°F (10 to 13°C) in a dry area with good airflow.
Check stored squash regularly and remove any that develop soft spots or decay.
Always check the needs of the type you grow, because some winter squash do not need the same curing treatment.
6. Pumpkins
Pumpkins are often treated much like other winter squash after harvesting.
Curing helps the rind harden and allows small scratches to heal. A hard rind provides better protection while the pumpkin is being stored.
Harvest pumpkins when they have reached their mature color and the rind has become hard.
Cut the pumpkin from the vine rather than pulling or twisting it off. Leave several inches of stem attached when possible.
Never carry a pumpkin by its stem. The stem can break off, leaving an opening that may make the pumpkin more likely to rot.
Many storage pumpkins can be cured for about 7 to 14 days at roughly 80 to 85°F (27 to 29°C) with good airflow.
After curing, store pumpkins at around 50 to 55°F (10 to 13°C) in a cool, fairly dry place with good airflow.
Keep pumpkins off damp floors and avoid piling them tightly together. Leaving space between them allows air to circulate.
7. Shallots
Shallots belong to the same plant family as onions and garlic, so their curing needs are similar.
Proper curing dries the outside layers and prepares the bulbs for storage.
Harvest shallots when the tops begin to yellow, dry, and fall over.
Carefully lift the bulbs from the soil. Shake or brush away loose dirt without washing them.
Spread the shallots in a single layer in a dry, shaded, well-ventilated location.
Depending on the conditions, they may need about 1 to 3 weeks to cure thoroughly.
The outer skins should become dry and papery, while the tops and necks should feel completely dry. Once cured, trim the roots and tops.
Check the bulbs before storing them. Use any damaged shallots first and save the firm, healthy bulbs for longer storage.
8. Peanuts
Peanuts are a little different because the part you harvest develops underground.
Freshly harvested peanuts contain quite a bit of moisture. They need to dry or cure before they can be stored safely.
When the plants are ready, carefully loosen the soil and lift the entire peanut plant. Try not to leave the pods behind in the ground.
Gently shake away excess soil.
In dry weather, freshly dug peanut plants may be left to wilt briefly with the peanuts exposed to the air. After that, move them to a protected location.
Hang the plants in a warm, dry place with plenty of airflow. Let them dry for about 1 to 2 weeks. Then remove the pods and spread them out to dry for another 1 to 2 weeks.
Do not store peanuts while the pods and kernels still contain too much moisture. Damp peanuts are more likely to develop mold.
Once they are properly dried, remove the pods from the plants and store them somewhere cool and dry.
9. Hard-Shell Gourds
Gourds can take much longer to cure than most of the other crops on this list.
Hard-shell gourds are often grown for crafts, containers, birdhouses, and decorations rather than as food. They need to become fully mature before harvesting.
Leave gourds on the vine as long as possible so the shell has time to harden. Harvest them when mature, especially before severe freezing weather causes damage.
Cut the gourd from the vine and leave a small section of stem attached.
Place harvested gourds somewhere dry and well ventilated. Do not crowd them together. Air should be able to move around each one.
The outside may begin drying within a few weeks, but the inside takes much longer.
Depending on the type and size, hard-shell gourds may take several weeks to several months to dry completely.
Some gourds develop surface mold while drying. This can happen during the curing process. However, gourds that become soft, mushy, or badly rotten should be discarded.
A fully dried hard-shell gourd should feel much lighter than it did at harvest. With some types, you may also hear the dry seeds moving inside when you shake it.
Why Should You Cure Garden Crops?
Curing may seem like an extra step, but it can make a big difference when you plan to store your harvest.
Freshly harvested crops can have small cuts, bruises, or scratches that you cannot easily see. Curing gives some of these minor injuries a chance to heal.
It also helps toughen protective skins and outer layers.
Garlic, onions, and shallots need their necks and outer layers to become dry. Potatoes benefit from having their skins toughen. Winter squash and pumpkins develop harder protective rinds.
Sweet potatoes get another important benefit: curing can help improve their sweetness and flavor.
Peanuts need to lose moisture before safe storage, while hard-shell gourds need an even longer drying period to become fully cured.
Common Crop Curing Mistakes
One of the biggest mistakes is treating every crop the same way. Different crops need different curing conditions.
Sweet potatoes need warmth and high humidity. Garlic, onions, and shallots need dry conditions with good airflow. Potatoes prefer cooler temperatures and darkness.
Do not assume every crop should be washed before curing. Potatoes, sweet potatoes, garlic, onions, and shallots are usually kept dry, with loose soil gently brushed away. Follow the proper curing method for each crop.
Poor airflow can also cause problems. When crops are piled together, moisture may become trapped between them. This can encourage mold and decay.
Spread crops out whenever possible.
You should also inspect everything before putting it into storage. Curing cannot repair severe damage or stop an already rotting vegetable from going bad.
Use damaged produce first and store only healthy crops for the long term.
Quick Garden Crop Curing Guide
Potatoes: Cure for about 2 weeks at 50 to 60°F in a dark area with high humidity and good airflow.
Sweet potatoes: Cure for about 7 to 10 days at 80 to 85°F with 85 to 90% humidity and good airflow.
Garlic: Cure for approximately 2 to 4 weeks in a dry, shaded, well-ventilated area.
Onions: Cure for about 2 to 4 weeks in a dry place with good airflow, or until the necks and outer skins are dry.
Winter squash: Many varieties can be cured for 7 to 14 days at around 80 to 85°F. Check the needs of your particular variety.
Pumpkins: Many storage varieties can be cured for about 7 to 14 days at around 80 to 85°F.
Shallots: Cure for approximately 1 to 3 weeks in a dry, shaded location with good airflow.
Peanuts: Dry or cure for roughly 2 to 4 weeks, depending on temperature, humidity, and airflow.
Hard-shell gourds: May take several weeks to several months to dry and cure completely.
Takeaway
Learning how to cure garden crops is a useful skill for gardeners who want their harvest to last longer.
You do not always need special equipment. Depending on the crop and your climate, a shed, covered porch, garage, spare room, or another protected area may provide suitable conditions.
The key is understanding what each crop needs.
Potatoes, sweet potatoes, garlic, onions, winter squash, pumpkins, shallots, peanuts, and gourds should not all be treated the same way. Give each one the proper temperature, moisture level, airflow, and curing time.
Once they are properly cured, you can move them into suitable storage and continue enjoying more of your homegrown harvest in the weeks or months ahead.




Add comment